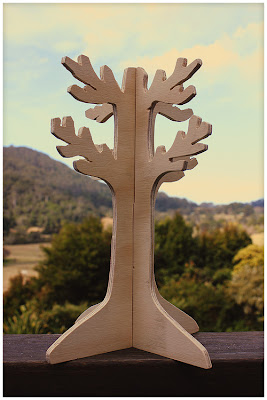
How to make a Jewelry Tree for under $10
Late in August I was a stallholder at the Made with Love markets in Coffs Harbour where I had my illustrations and jewelry on show. A month before I had the brilliant idea to attempt to create my own jewelry trees on a very tight budget... so of course, I went on a trip to Bunnings and found myself a little sheet of plywood for less than $9. Now, assuming that you already have the power tools, a pencil, a few pieces of paper and a bit of sandpaper just laying about, then all you need is a bit of plywood and you're ready to make your own handmade jewelry display tree
Here's the list of things I used:
- Jewelry Tree Template (prints on 2 sheets of A4 paper ~ make it larger/smaller if you like)
- 1 x small sheet of craft plywood (7mm thickness, I bought a piece from Bunnings 120cm x 40cm for $8.95. It was the smallest piece available & I could easily cut 2 x 30cm tall trees from it)
- Jigsaw (with sharp fine blade suited to cutting craft plywood)
- Pencil ~ for tracing template
- Eraser ~ for fixing mistakes & getting rid of template lines later
- Scissors
- Medium & Fine sandpaper
- Acrylic Paint ~ optional (if you like a painted finish. I left mine unpainted to show the timber grain)

My jewelry tree templates were created from a rough sketch I drew on paper which I modified a little in photoshop. All it took was a little rudimentary maths to work out how to create a template that would slot together...


Cutting out and tracing the templates onto the plywood was a slow task...would have been made much faster if I'd had a sheet of carbon paper or just a big graphite stick to rub all over the back of my template... oh well, you live and learn.
Then, I set up my makeshift clamp workbench outside where all the sawdust could blow away in the wind...and bravely taking the jigsaw in hand I cut, sawed, chopped and hacked my way through my plywood sheet until I had something resembling a cut out tree.

Wish I had a laser cutter right now.
Obviously I made a big mistake in using the largest saw blade (I couldn't find any others in the shed)
because the blade was too large and blunt for such soft plyood and it messed up some of the tight corners and fine details on my branches. So next time I'll be using a finer blade and maybe taking my time.

When you have no sandpaper, rough nail files do the trick! And they are particularly handy for these tiny corners and spaces between branches. If you are using sandpaper, wrap a piece around a pencil or piece of wood dowel and it will make it much easier to smooth off all those little curves, nooks and crannies.

The pieces only needed a little final adjustment of the center slot before they fit together perfectly. You want to make sure the pieces slide together and slide apart with ease...not so loose that the tree wobbles... not too tight or they could be damaged.

I'm now one satisfied little DIYer. No one can ever tell me again that you cannot cut round shapes with a jigsaw.

Here's the template if you'd like to make your own...
 |
 |
 |
This template prints out on A4 paper but feel free to make it bigger or smaller for your project & send me pics!... especially if you're using yours at a market or craft show... I'd love to see the result and maybe I'll add it to my Market Stall Inspiration board on pinterest


Inspired? I hope so
xox


What a lovely idea! I think I might get the manbeast to fashion me one. :)
ReplyDelete